Database node is used to get the data from external Databases by giving the connection details in the configuration. It is also used to connect to the external Databases to perform various actions like storing/modifying the data etc.
The supported databases are Oracle, PostgreSQL, MSSQL Databases.
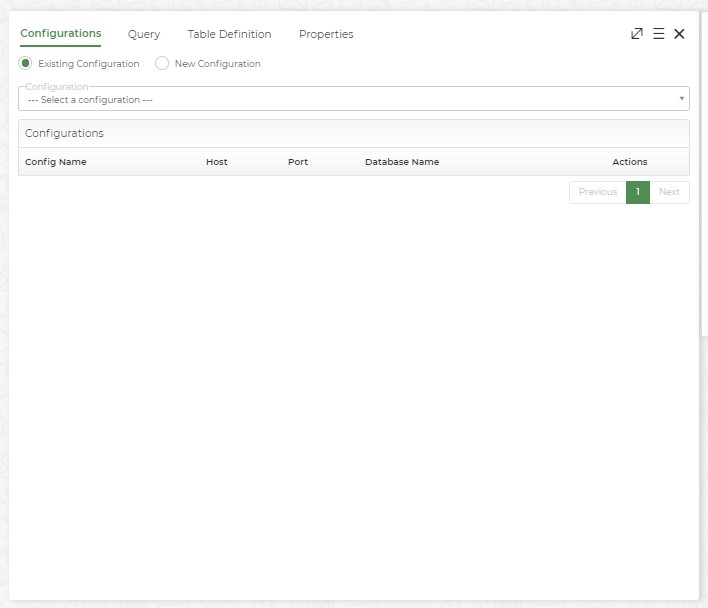
Setting Up Database Configuration
- Double-click on the Database node.
Select any existing configuration if it matches the criteria of the user or create a new configuration.
The user can also edit or copy the existing configuration by clicking on the Edit and Copy icons displayed against each configuration, respectively.
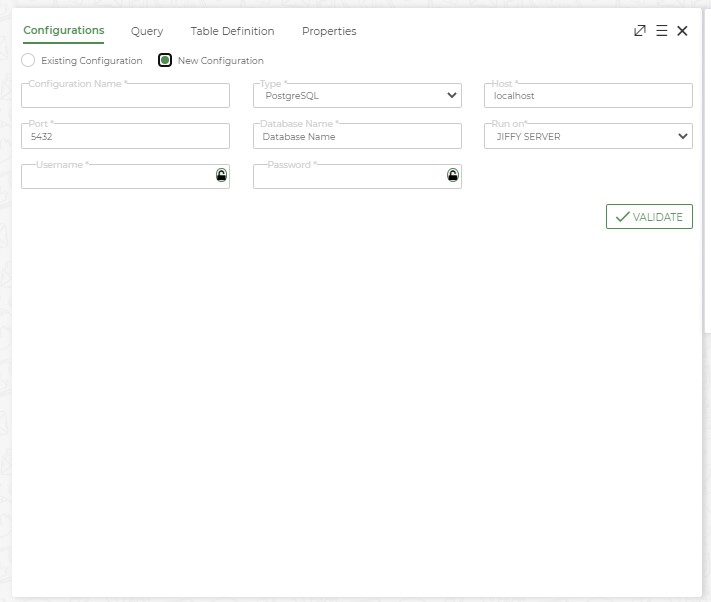
Click on the New Configuration radio button to create a new configuration if required. Add the following details:
- Configuration Name: Type the name of the configuration
- Type: Select the type of Database to connect to from the dropdown.
- Host: DB Server name
- Port: Port no. in which DB is running to accept the incoming traffic.
- Database Name: Name of the database for which new configuration is getting created.
- Run on: Choose either one of the option Jiffy server or Cluster.
- Jiffy Server: Selected when a direct interaction is possible between the Jiffy Server and the Database server.
- Cluster: Selected when a direct interaction is not possible between the Jiffy server and the Database server. So, the connection made using the clusters.
- Username: DB username to connect to the Database. Secure Vault keys can be used as the username.
- Password: Password of the DB user to connect to the Database.
- Cluster: Select the required cluster if running the node on Cluster.
- Validate Button: To test the DB connection with the provided DB credentials.
Click on the VALIDATE button and then click on the CREATE button when the provided details are successfully validated without any error.
Validating DB Connection While Creating The Configuration
- If the validation is successful, a green tick appears in the VALIDATE button. The DB connection will be established and the status as Success for each machine in the cluster will be displayed.
- If the validation fails, the status of the connection will be shown as Failure in red color. An alert Invalid Username/Password, Please provide valid DB details must be displayed and redirected to provide the right credentials and follow the same procedure to validate again. CREATE button will be in disabled state.
- In case of incorrect credentials, the validation will not be carried out on all the machines in the cluster, it will be attempted only on one machine and the results are returned. This is to avoid any locking of credentials due to an attempt of logging in from multiple machines with wrong credentials.
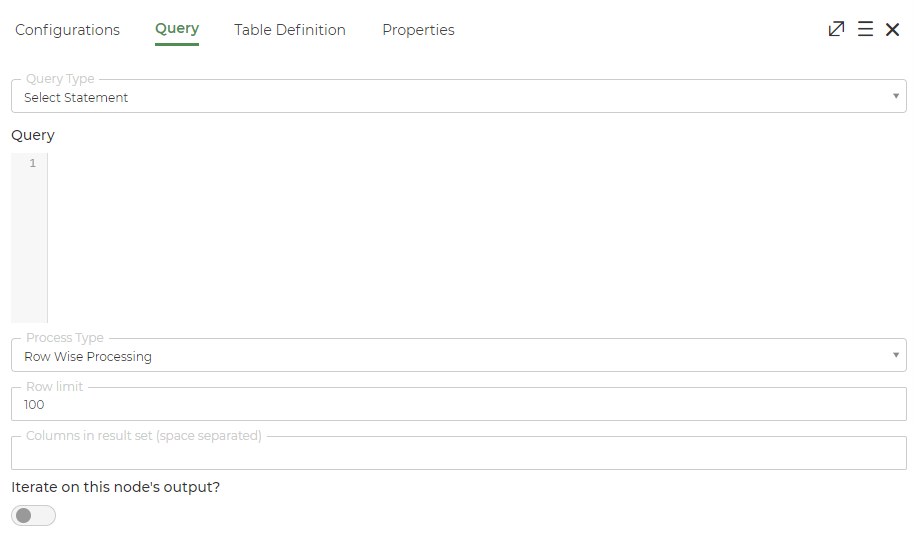
Writing A Database Query
Click on the Query tab to configure the queries for retrieving or updating data. The query editor is like the SQL editor and will host a SQL.
2 types of queries are supported:
- Select Statement
- Update Statement
Parameters in the query can be passed in the following format:
- String values: ‘${String}’
- Integer values: ${Integer}
Select Statement
Provide the following details to use Select statement.
- Query Type: Designer has to choose the Select statement option.
- Query: Provide the user defined query.
- Process Type: Select either Row wise processing or Bulk Processing option.
- If the Row wise processing option is selected, then specify the following details:
- Row Limit: Designer must specify the select statement output row limit. By default it will be 100.
- Columns in result set (space separated): Designer must provide the column names to be displayed in the result set and they must be space separated.
- Iterate on this node’s output?: Toggle button to be set to ON if the task has to iterate on the DB nodes output.
- If the Bulk processing option is selected, then specify the following details:
- Table Name: Choose the pre-defined data table to which the entire data processed as a bulk will be stored. Read about Data table here.
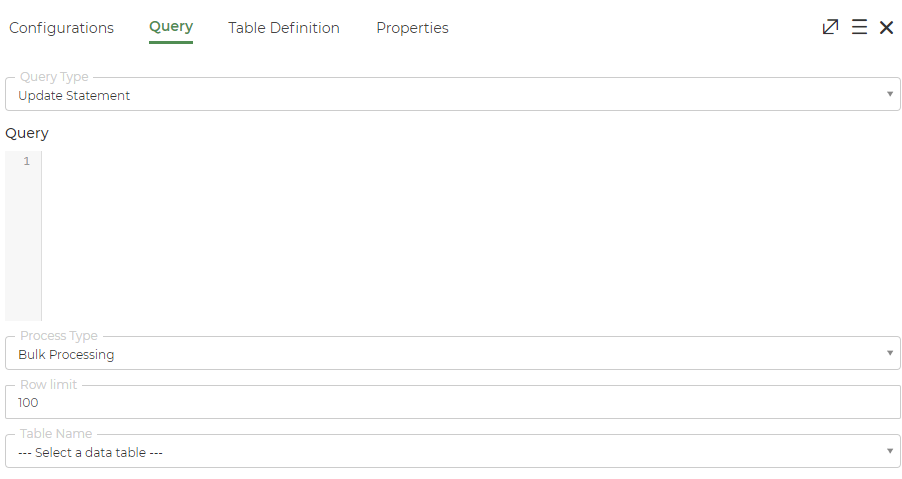
Update statement
Provide the following details to use the update statement option.
- Query Type: Designer has to choose the Update statement option.
- Query: Provide the user defined query.
- Process Type: Select either Row wise processing or Bulk Processing option.
- If the Row wise processing option is selected, then specify the following details:
- Iterate on this node’s output?: Toggle button to be set to ON if the task has to iterate on the DB nodes output.
- If the Bulk processing option is selected, then specify the following details:
- Row Limit: Designer must specify the update statement output row limit. By default, it will be 100.
- Table Name: Choose the pre-defined data table to which the entire data processed as a bulk will be stored. Read about Data table here.
Table Definition
Read about Table Definition here.
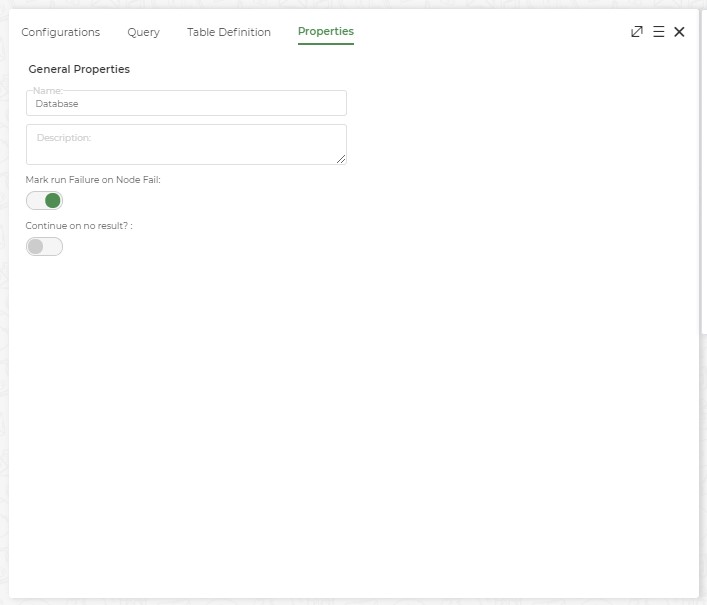
Properties Of Database Node
- Name: Name of the node. A default name is displayed in this field, which the user can edit according to the task and the intent of using the node.
- Description: A short note on the purpose of the node.
- Mark run Failure on Node Fail? : When the Mark run Failure on Node Fail field is ON and if the node execution fails then the
complete task execution is marked as fail.
- Continue on no result?: When Continue on no result? field is ON, the task execution continues even when the database query returns no results. When Continue on no result? field is OFF, if the database query returns no results, the execution will not continue to the next node.
Refer to Database Automation with Polling sample task to know how to use Database node in a task.