The Execution Bots dashboard displays the status and other information of Execution Bots.
The Execution Bots page is displayed with the details of all the Bots created in the application.
- ID: ID of the Bot.
- Name: Name of the Bot.
- Machine: Machine name is the combination of FQDN and Unique ID. It is a drop-down with the list of FQDNs (Fully Qualified Domain Name) and Unique ID that are extracted from the list of registered machines in the Jiffy server once the client installation is completed. The number of machines that are registered on the server is also displayed.
- Version: The version of the client package.
- Started by: The name of the Tenant Admin who started the Bot.
- Status: The status of each Bot.
- At Rest: Bot and Windows services are started but no tasks are executing.
- Starting: Bot is about to start.
- Running: Bot and Windows services are started. Tasks associated with the Bot are getting executed.
- Stopping: The Bot which is running is about to stop.
- Updating: The client version is upgrading.
- Not Running: The Windows service is started, and the Bot is not started.
- Not Available: Both windows service and the Bot are not started.
- Last Executed: Details of when the Bot was last used. It could be any of the following:
- Under Execution: The Bot currently executing its tasks.
- Timestamp: Timestamp of the last executed task that was executed using that Bot.
- Actions: Different actions that can be performed on the respective Bots.
- Click the
.png) or
or .png) icon to start or stop the bots.
icon to start or stop the bots.
- Click the
.png) icon to edit the bot.
icon to edit the bot.
- Click the
.png) icon to delete the bot.
icon to delete the bot.
Start/Stop Procedure
- Click the icon provided against each Bot under the Actions column in the Jiffy Bots console to start the bot. The virtual machine you are intending to start logs in automatically, and the bot starts.
- Once the Bot starts, the status of the Bot gets updated to:
- Running if any task is being executed.
- At Rest if NO task is being executed.
If the execution bot is not starting, there may be an additional security warning message that must be clicked on the remote machine. In such scenarios:
- Manually log in to the remote machine.
Make sure that you have logged in to the remote machine with the same user which was used while creating the execution Bot.
- Click OK button for the security warning message.
- Navigate to Task manager –> Services and ensure that Jiffy JPipe Client and Jiffy System Manager processes are up and running.
It is recommended not to restart Jiffy System Manager and Jiffy JPipe Client services in multi-bot machines, as it can impact other bots which are in use.
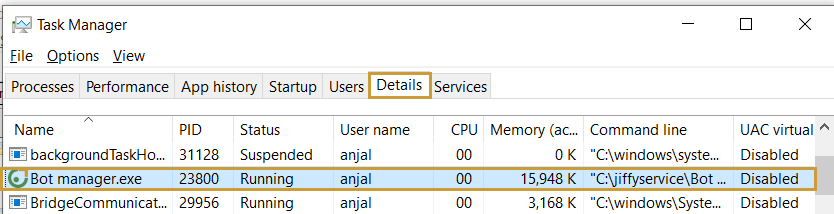
- Navigate to Task manager –> Details and ensure that Bot manager is up and running.
- Click the icon to start the Execution bot from the Jiffy Bot Console.
Login/Logoff nodes do not work if any additional security warning messages appear at the login screen of remote machine.
- Click the icon provided against each Bot to stop the bot from the Jiffy Bot Console.
- Once the Bot stops, the status of the Bot gets updated to:
- Stopping if the Bot which is running is about to stop.
- Not Running if the Windows service is running, and the Bot is stopped.
- Not Available if both Windows service and the Bot are stopped.
Add New Bot
Bots can be added from the Bots console. Newly added Bots get auto-registered in the Jiffy server. The ports to be associated with a Bot are picked automatically from the available free ports whenever the Bot is started.
- Click the + icon at the top right corner of the window. Add Bot dialog box appears.
Specify the following details:
- Name: Name of the Bot. This is a unique value specific to each Bot.
- Machine: Machine name is the combination of FQDN and Unique ID. It is a drop-down with the list of FQDNs (Fully Qualified Domain Name) and Unique ID that are extracted from the list of registered machines in the Jiffy server once the client installation is completed. The number of machines that are registered in the server can also be known.
- Capabilities: It is a list of automation capabilities. The user can select one or more options based on the required automation capability of that Jiffy Service. The various automation capabilities are:
- SAP
- Web
- Putty
- Desktop
- Excel
- Java
- Mainframe
- PDF
- ALL: Includes all the automation capabilities
- JVM Parameters: This allows the user to override the default values of the parameters. Click the Info icon for more details on JVM parameters and how to set up a bot. The following are the valid JVM parameters for starting a bot.
- -Xmxm: The user can specify the memory to a bot using this parameter. Example: -Xmx1400m
- Djiffy.mode: The default mode is “run”. If the user wants to debug, then the mode can be changed to “debug”. Example: -Djiffy.mode=debug
- Djiffy.ocr.threshold: OCR character threshold. Example: -Djiffy.ocr.threshold=250
- Djiffy.ocr.conversionTimeout: The default time is 3 min. If conversion timeout must be increased, then change the value in milliseconds. Example: -Djiffy.ocr.conversionTimeout=300000
While creating or editing a machine, the user must add the -Dfile.encoding=utf-8 code in the JVM parameters text box. So, the user must make sure that the -Dfile.encoding=utf-8 code in the JVM parameters text box is available before starting a machine.
- Username: The Username field is used for Login and Logoff nodes execution. The user can edit this field and provide a specific username if the machine is being used in login and logoff nodes.
- Password: The Password field is used for Login and Logoff nodes execution. The user can edit this field and provide a specific password if the machine is being used in login and logoff nodes.
The username and password can be provided manually or by enabling the Lock icon to use the Secure vault keys.
Ensure that the username entered is in same case.
Click the SAVE button.

.png)


.png)